Friday, February 15, 2013

Removing and replacing laptop keyboard

Removing and replacing laptop keyboard:
These instructions will help you to remove and replace keyboards on various laptops. I will not be able to cover all models but you’ll get the idea. Steps for removing and replacing the keyboard are similar for most laptops.
Warning!

- if your laptop is still covered by the manufacturer’s warranty, do not open the case or you can loose the warranty

- always remove the battery and unplug the AC adapter before you open the laptop case

- if you damage the keyboard connector on the motherboard you’ll have to replace the whole motherboard

- proceed on your own risk
Sony laptop
I took these pictures from a Sony Vaio PCG-K33 (model PCG-9S1L) notebook. Should be similar for some other Sony notebooks too.
Remove keyboard bezel
(more…)

DC power jack repair guide. Do-it-yourself instructions.

DC power jack repair guide. Do-it-yourself instructions.:
This guide will explain how to repair a failed or loose DC power jack on a laptop computer yourself. Here’s my previous post related to DC power jack related issues.
Disclaimer: I’ve made these instructions only for people experienced with soldering and repairing computers. If you don’t feel comfortable doing this job, please do not open the laptop or you can permanently damage your computer. Take your laptop to a professional repair shop instead.

Use this repair guide at your own risk. :)

First of all, you’ll have to disassemble your laptop and remove the motherboard. Here you’ll find disassembly instructions for some major laptop brands such as IBM, Dell, HP, Compaq, Toshiba. If your laptop is not on the list, you’ll have to figure out yourself how to take it apart.


For this repair you’ll need the following tools.


1. Soldering iron or soldering station. I use Weller WES51 soldering station and for this job I set temperature to about 800-850°F.

2. I use high-tech rosin core silver-bearing solder from Radioshack with diameter 0.022″ ( Catalog #: 64-013 ). I think standard rosin core solder will work just fine.

3. Desoldering pump for removing solder around component leads. I use Edsyn Soldapullt pump, model DS 017.

4. 99% isopropyl alcohol and tooth brash for cleaning the motherboard from flux.

5. A new DC power jack, you can find a cheap one here.
DC jack repair tools
Laptop DC power jack repair guide.
Laptop DC power jack
As you see on the following picture, the solder drop on the positive terminal looks different than on other three contacts. That’s where the problem is. The positive pin is not making a good contact with the motherboard and because of that power to the laptop cuts off when I move the power plug inside the power jack.

(more…)

How to replace laptop backlight lamp (CCFL)

How to replace laptop backlight lamp (CCFL):
In this guide I will disassemble a laptop LCD screen in order to remove and replace the backlight lamp (CCFL).

Replacing the backlight lamp is not an easy task even for experienced technicians. If you do something wrong you will permanently damage the LCD screen and have to buy a new one. Proceed on your own risk and do not blame me. :)
Some recommendations before you start:

1. Work in a clean room. You don’t want dust and lint inside your LCD screen.

2. Make notes, so you know how to assemble your screen back.

3. Take pictures.

4. Before you remove something, take a closer look at the part and memorize how it is assembled.

5. When you are assembling the screen, remove dust and lint with compressed air. Do not use cloth.
The backlight lamp (CCFL) is located inside the LCD screen, so we are going to take it apart. In this article I’m not going to explain how to remove LCD from a laptop, it’s been covered before.

Here some examples:

Removing LCD screen from a Dell laptop.

Taking apart IBM ThinkPad display panel.

Removing screen from Toshiba laptops.
LCD screen with bad backlight lamp
Remove sticky tape and foil from the back of the screen and glue it somewhere so you can reuse it later, when you assemble the screen.
Remove tape
Removing tape from the backlight cables.
Release backlight lamp cables
On my screen the green circuit board was glued to the plastic frame with a double sided tape. Carefully unglue the circuit board. Be very careful, do not flex or bend the circuit board.
LCD circuit board
The circuit board has been unglued.
Remove circuit board
Place the LCD screen on the side and start removing the metal frame witch secures the LCD to the plastic frame. There will be many latches on all sides of the frame, you can unlock them with a small screwdriver.
Open latches
Continue separating the metal frame from the plastic base.
Separate LCD frame
On the following picture you can see that frame, LCD with the circuit board and screen base have been separated. Be careful, do not touch internal components with your fingers. Handle all internal components by the sides.
Remove LCD
Place the metal frame and LCD with the circuit board aside. You’ll need them only when you assemble everything back together.
LCD
There will be a few transparent layers inside. Carefully remove them from the screen base. Do not separate the layers, just put them aside together.
Transparent layers inside screen
Keep everything organized, so you have no trouble assembling the screen.
Set aside
Start removing the metal cover from the backlight lamp (CCFL).
Remove backlight cover
The backlight cover has been removed.
Backlight lamp cover
The backlight lamp (CCFL) cables are routed through small plastic hooks.
Backlight lamp cables
Unroute the backlight lamp cables.
Release backlight cables
Now probably the hardest part in this disassembly process - removing the backlight lamp and reflector. The backlight lamp is secured inside the reflector so you have to remove both and then separate them.

Before you remove the backlight lamp and reflector take a closer look how it’s assembled and mounted to the screen base. Fitting the backlight and reflector back in place could be a very challenging task.
Remove backlight lamp reflector
The reflector is glued to the screen base with a double sided tape.
Backlight reflector
After the reflector has been unattached from the screen base, you can start removing the backlight lamp. As you see on the picture, I marked the left side of the reflector with a red dot so I know where the red cable goes when I assemble everything back together.
Remove backlight lamp
The backlight lamp (CCFL) has been removed from the reflector.
Backlight CCFL lamp
In order to access the backlight lamp leads you’ll have to remove the rubber caps from both side of the lamp. I’m not sure if you can touch the backlight lamp with your fingers, so I would use rubber gloves.
Remove cover
Cabled on both sides of the backlight lamp are soldered to the backlight leads. In order to access the leads you’ll have to remove the black insulator on both side of the lamp.

Unsolder both cables from the old backlight lamp and solder them to a new one.
Cable soldered to backlight lamp
You can test the new backlight lamp (CCFL) before you install it back into the screen. Connect the backlight lamp into the inverter board and turn on the laptop. The backlight lamp should light up.

From my experience, on some laptops the backlight lamp will not light up until the video cable is connected to the LCD screen. In this case you’ll have to assemble the LCD screen and then test it.
You can search for a new CCFL backlight lamp here.
Test backlight lamp

Service manuals for Sony Vaio laptops and notebooks

Service manuals for Sony Vaio laptops and notebooks:
Today I found a great source with service manuals for Sony Vaio VGN series laptops and notebooks. Links to the service manuals were posted on one of the Russian forums (comment 13). Not sure for how long these service manuals will be available for downloads but they are the time of wringing this post. Some files are large and it might take some time to download them, so be patient.
Need spare parts for a Sony laptop? Search here.
All service manuals are in PDF format and you can download them using below mentioned links.


Service manuals for Sony Vaio laptops and notebooks:

Sony VGN-A


Sony VGN-FS


Sony VGN-AR


Sony VGN-N


Sony VGN-AX


Sony VGN-S


Sony VGN-B


Sony VGN-SZ


Sony VGN-BX


Sony VGN-T


Sony VGN-C


Sony VGN-TX


Sony VGN-FE


Sony VGN-U


Sony VGN-FJ


Sony VGN-UX


Here’s another source for older Sony Vaio PCG series laptops and notebooks. Thank you to www.elhvb.com
PCG-R505AFE >>Get it here PCG-FX777, PCG-FX877 >>Get it here
PCGA-DSD5, PCGA-DSM5 >>Get it here PCG-R505JE, PCG-R505JEK, PCG-R505JEP, PCG-R505JL, PCG-R505JLK, PCG-R505JLP, PCG-R505JS, PCG-R505JSK, PCG-R505JSP >>Get it here
PCG-SR27, PCG-SR27K >>Get it here PCG-C1VP, PCG-C1VPK >>Get it here
PCG-FX210 >>Get it here PCG-GR150, PCG-GR150K, PCG-GR170, PCG-GR170K >>Get it here
PCG-FX220, PCG-FX220K, PCG-FX240, PCG-FX240K, PCG-FX250 PCG-FX250K, PCG-FX270, PCG-FX270K >>Get it here PCG-GRS150, PCG-GRS170 >>Get it here
PCG-FX290, PCG-FX290K >>Get it here PCG-GRS175 >>Get it here
PCG-FXA32, PCG-FXA33, PCG-FXA35/D, PCG-FXA36 >>Get it here PCG-GRV550 >>Get it here
PCG-FXA53, PCG-FXA59 >>Get it here PCG-GRZ530 >>Get it here
PCG-GRX670, PCG-GRX690 >>Get it here PCG-VX89, PCG-VX89K, PCG-VX89P >>Get it here
PCG-NV290 >>Get it here

If you know other sources for Sony laptop manuals, please feel free to post links in comments.

Do you have a problem with your Sony Vaio laptop? Post it here, somebody can help you.

How I fixed laptop memory slot failure with a guitar pick

How I fixed laptop memory slot failure with a guitar pick:
Is it possible to fix laptop memory slot failure with a guitar pick? Yes, it is. You will not fix the memory slot itself, but you can work around the problem. :)

Today I received a Toshiba Satellite Pro 4600 laptop with the following complaint:
The laptop starts and works properly, but recognizes only one of the two memory modules installed. The laptop has two 256MB RAM modules installed, but registers only 256MB.
Two memory modules
First of all, I removed the memory cover to find out if both memory modules are installed correctly. The laptop had two 256MB Kingston modules installed and they were seated properly.


256MB memory detected


When I started the laptop and entered the BIOS setup menu, I found that only one of the two memory modules is detected and the laptop registers only 256MB (262144KB) of RAM instead of 512MB (524288KB).

Just a side note. In the computer world 1MB=1024KB. That’s why 256MB=262144KB and 512MB=524288KB.
I tried reseating both memory modules but it didn’t help.

After that I tried installing both memory modules in both memory slots one by one and here’s what I found. The laptop worked absolutely fine when both memory modules were installed into the slot A, but failed to boot with both memory modules installed into the slot B.

Apparently, there is nothing wrong with the memory modules and the laptop has a faulty memory slot B. The memory slot is permanently soldered on the motherboard. If one of the slots fails you’ll have to replace the whole motherboard or use the laptop with only one working slot.

Buying a new motherboard for this older laptop wouldn’t make any sense because it’s too expensive, but the laptop is still in a good working condition except the faulty memory slot B, so I continued playing with that trying to find the solution.
press on memory module
I noticed that the laptop start normally with the memory module installed into the faulty slot if I slightly press on the module with my thumb. And this gave me an idea.
guitar pick
This guitar pick is going to fix my laptop. :)
install guitar pick
I installed both RAM modules back into the slots and then placed the guitar pick over the module in the slot B as it shown on the picture.
close memory door
I thought if I close the RAM door it will press on the guitar pick/memory module and it will have the same effect as pressing on the module with my thumb. And it worked!
512MB memory detected
Both memory modules were detected properly and the laptop registered all 512MB. After “the fix” I tested memory with Memtest86+ and the laptop passed the test.

I wouldn’t call it the best solution for fixing a faulty memory slot but in some cases it will work.
By the way, I didn’t charge the customer for this “repair”, he knows what is going on and how I “fixed” his problem.

Installing internal wireless card into an older laptop

Installing internal wireless card into an older laptop:
This tutorial explains how you can install internal wireless card into an older laptop. I assume that your laptop is “wireless ready” which means it has a slot for the wireless card and equipped with wireless antennas, but missing the wireless card. Why did I make this tutorial for an older laptop? Because all new laptops are sold with the wireless card.
Find wireless slot
I’ll take as an example my Dell Latitude C840 laptop. As you see on the picture, it has a slot for the wireless card and one antenna cable. That’s strange, most laptops have two antenna cables, white and black. One cable goes to the main connector on the wireless card, another cable goes to the auxiliary connector. Probably you’ll ask me which antenna cable connects to which connector? I think it doesn’t really matter because both antenna cable are identical.
Laptop wireless card


My main concern was finding the right device driver for the wireless card I plan to install into my laptop. As you know, without correct driver it will not be recognized by the operating system and will not work at all.

Likely, I have a spare wireless card from another not working Toshiba laptop and this card worked perfectly.

You can find this wireless card by the model number: WM3B2200BG. Just search by the model number here and you’ll find one for about $20. It’s a 802.11 b/g wireless card, so you’ll get a 54Mbp/s connection as I did.
Install wireless card
In order to install the wireless card into the slot, just push it into the slot at a 30 degree angle (step 1) and then press on the card (step 2) until it’s locked.
Connect wireless antenna
After the card is locked in the slot you can connect the antenna cable. In my case, I snapped the antenna cable on the main connector. If you have two antenna cables, snap one of them on the main connector on the wireless card and another one on the auxiliary connector. As I mentioned before, I don’t think it matters with cable goes to which connector. Both antenna cables are identical.
Finally, you’ll have to download and install the wireless card driver. If you use the same card as I did (WM3B2200BG), you can download driver from the Intel website here.

Use this link: Intel® PRO/Wireless 2200BG Network Connection. Select the operating system, download and install the driver.

You have a couple of different options:

1. Download and install the driver only. Use this option if you want to use Windows wireless connection utility. That’s what I did because I prefer using Windows tools.

2. Download and install both the wireless card drive and the connection software. Use this option if you want to use Intel’s software application. It’s totally up to you.
Wireless card connected
As you see on the picture above, the wireless card successfully connected to the wireless access point at 54Mbp/s.

Laptop LCD screen turned completely white

Laptop LCD screen turned completely white:
What can you do if the laptop LCD screen turned completely white? From my experience I can tell that this problem may be related to the following:

1. Loose connection between the video cable and the LCD screen.

2. Defective LCD screen.

3. Defective motherboard (I assume the graphics card is integrated into the motherboard).
Laptop screen is white
Here’s an example of a laptop with white screen. When you turn on the laptop, it starts but the image on the screen is completely white right from the beginning. In my case it was a Toshiba Satellite M45 laptop but this problem may occur with any other brand.


Test laptop with external monitor


Most likely you still can use the laptop with an external monitor. Just connect the monitor to the VGA port on the back or side of your laptop and then switch the video output from internal to external mode.

On Toshiba laptops you can toggle between internal and external screens using Fn+F5 keys. Hold down Fn and press on F5 until you get video on the external monitor.

On IBM laptops use Fn+F7.

On HP laptops use Fn+F4.

It’s possible that you have to use a different key combination on your laptop but you get the idea.

On some laptops, in order to be able to use the external monitor, you have to connect it to the laptop and then restart the laptop so the external monitor is detected by the laptop.
Laptop video cable
I noticed that in some cases the laptop screen may turn white because of poor connection between the video cable and the LCD screen. If you want to check this connection, you’ll have to take apart the display panel because the connector is located on the back side of the LCD screen.

These laptop service manuals and disassembly instructions may be useful.
Reconnect video cable
I always check the video cable connection first. Reconnecting the video cable may fix your problem.

If reconnecting the video cable doesn’t help, most likely you have a problem either with the LCD screen or with the motherboard.
Disconnect LCD screen
The best way to find out witch one is causing the problem is testing the laptop with another working LCD screen. Without this test you’ll have to guess because as I mentioned before this could either bad motherboard or bad LCD screen.

You’ll have to disconnect the video cable from the LCD screen (connector 2) and the inverter board (connectors 3 and 1). After that you connect another working screen and test video.
Test laptop with another LCD screen
For this purpose I’m using one of my test LCD screens. My test screen is cracked and because of that you see a wide white band in the center but it still works fine for this test.

The original screen is white but my test screen works normal (except the crack of course) and I can see the image. After this test I can tell that the problem must be related to the screen.
White LCD screen
After I assembled everything back together and connected the original LCD, it’s still white.
CONCLUSION. In my case this problem is related to the LCD screen and it has to be replaced.

Laptop is dead. How to troubleshoot the problem.

Laptop is dead. How to troubleshoot the problem.:
In this post I’ll explain how to troubleshoot a dead laptop and find the problem. The following troubleshooting tips are not model and brand specific, they should work for most laptops.
Let’s take a look at two different scenarios.
Example 1. The laptop is absolutely dead.

When you plug in the power adapter and press on the power button, there is no signs of life at all. The laptop will not make usual noises, LEDs will not light up, the fan will not spin, the screen is blank and black, etc… In short, the laptop is dead.
What you can do in this case?

1. Make sure the wall outlet is working and the laptop DC adapter is getting power from the outlet. Try another wall outlet.

2. Test the laptop DC power adapter, make sure the voltage output is correct. You can test the DC power adapter with a voltmeter.

3. Let’s say the DC adapter is fine and the adapter outputs correct voltage. In this case unplug the power adapter from the laptop, remove the battery, wait for 1-2 minutes, plug in the adapter and try turning on the laptop again.
OK, you tested the adapter and it’s bad. If you decide to replace the original DC adapter with a generic one, you’ll have to follow this rule:

The voltage output on your new adapter has to be exactly the same as on the original adapter. The amperage on the new adapter could be the same or higher.
If nothing helps and the laptop is still dead, apparently 
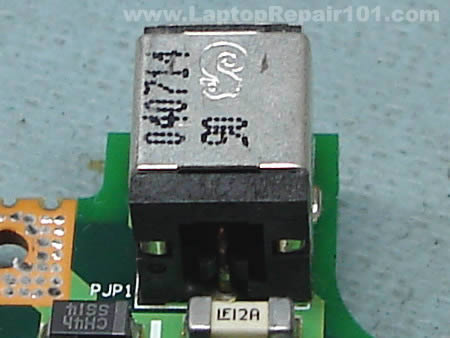
the motherboard is fried or there is a problem with the DC power jack. It’s possible the DC power jack is broken and the motherboard is not getting any power from the adapter. In this case you’ll have to disassemble the laptop and replace the power jack. Check out this guide for fixing laptop power jack.
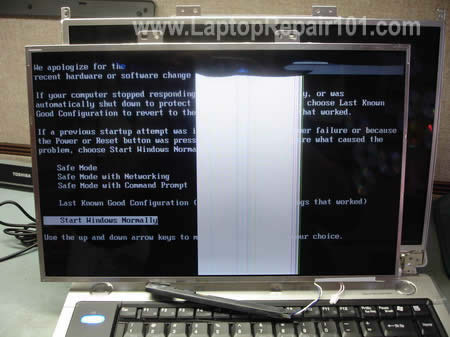
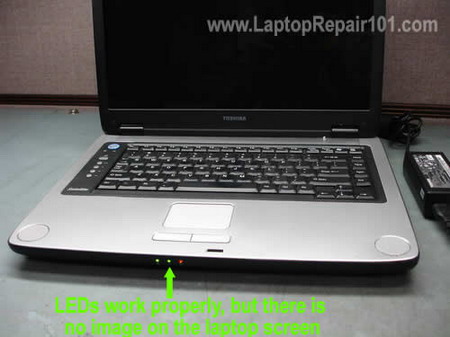
Example 2. When you plug the DC power adapter and press on the power button, the laptop starts making normal noises, the LEDs work properly but noting appears on the screen. The laptop will not start.
Troubleshoot dead laptop


First of all, take a closer look at the LCD screen. Look at the screen under bright light. It’s possible that the image is still on the screen but it’s very faint. If that’s the case, check out these tips for troubleshooting laptop with backlight failure.
Connect external monitor
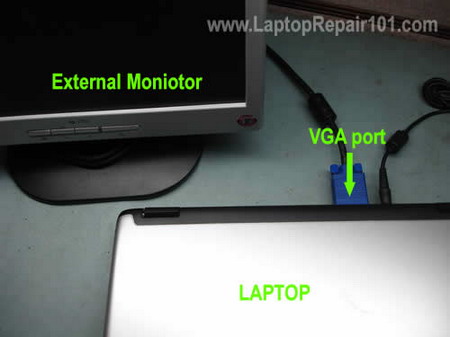
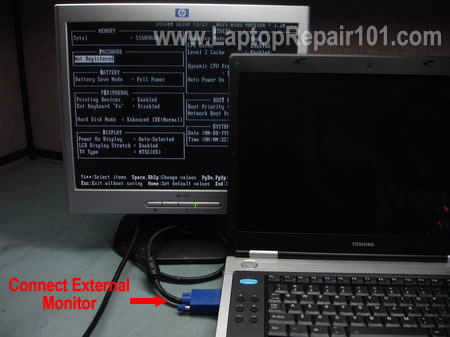
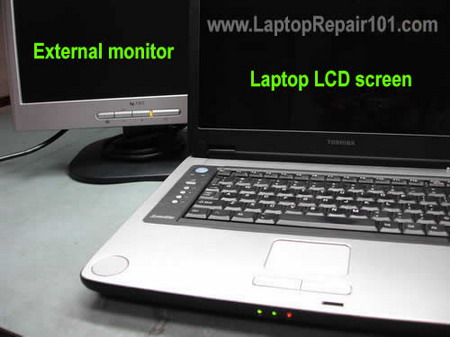
If there is no image on the laptop LCD screen, test the laptop with an external monitor. Connect an external monitor to the VGA port on your laptop and turn the laptop on. You can toggle video output between the internal LCD screen and external monitor by pressing Fn and F4 keys simultaneously on HP laptops, Fn and F5 keys on Toshiba laptops, Fn and F7 keys on IBM laptops. Other laptops may use different key combinations.
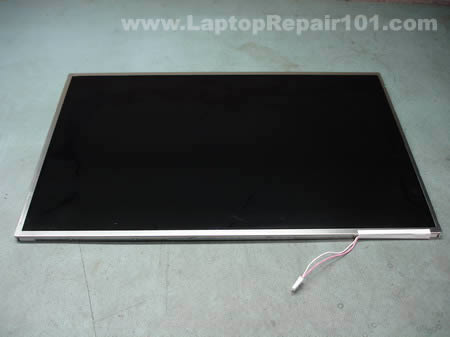
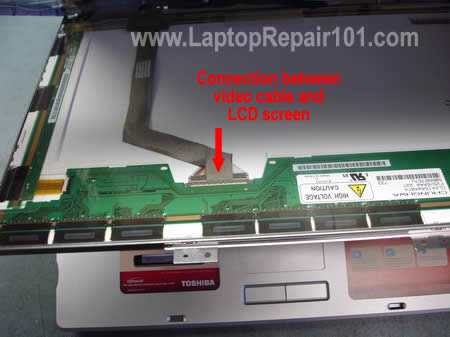
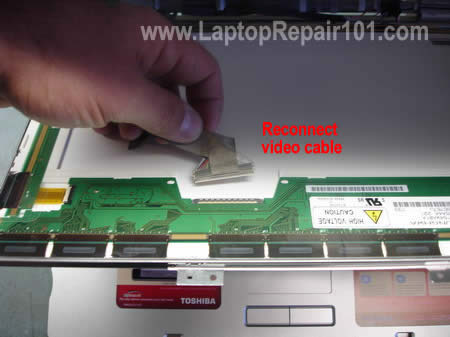
Let’s say the external monitor works fine but the internal LCD screen has no image at all. If that’s the case, your problem could be related to the LCD screen or the video cable. Also, make sure the video cable makes good connection with the motherboard and the LCD screen. Try reconnecting, reseating the cable.
Test external video
In my case, both internal and external monitors were absolutely dead. Neither of them had image. That means the problem is not related to the LCD screen or the video cable. From my experience I know that this problem could be related to the laptop memory.
Replace reseat memory module
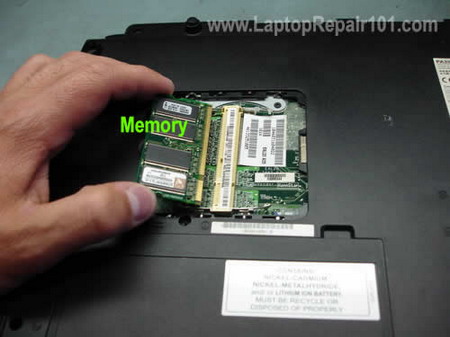
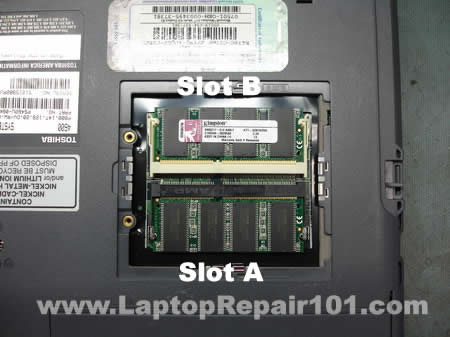
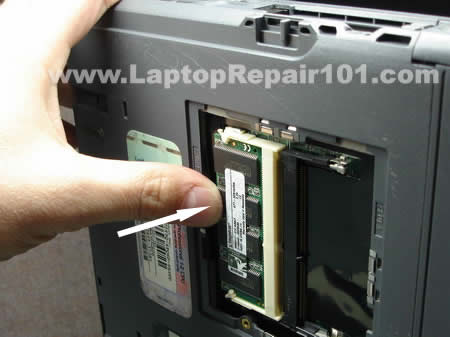
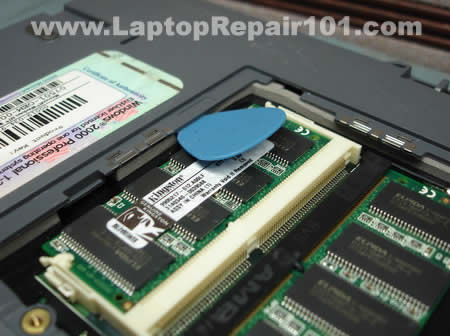
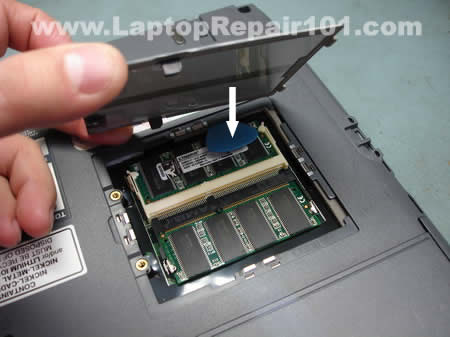
Try reseating the memory module, maybe it’s not making good connection with the memory slot. Try cleaning contacts on the memory module with pen eraser. Try moving the memory module into another slot. Try replacing the memory module with another known good module, it’s possible that your original module is dead.

If you have two memory modules installed you can try removing them one by one, it’s possible that one of the modules is bad. Try installing different memory modules into different memory slots.
In my case reseating, swapping the memory module didn’t help. I was pretty confident that my problem is not memory related and I moved on.
Remove hard drive DVD drive
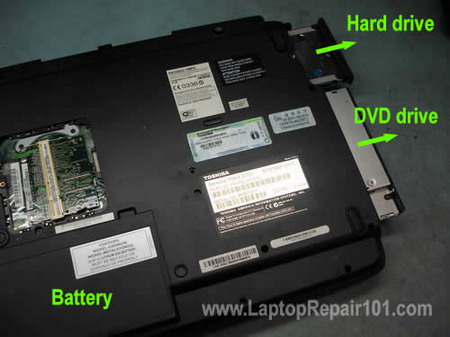
Try removing battery, hard drive and DVD drive and turning on the laptop without these components.
Disconnect display
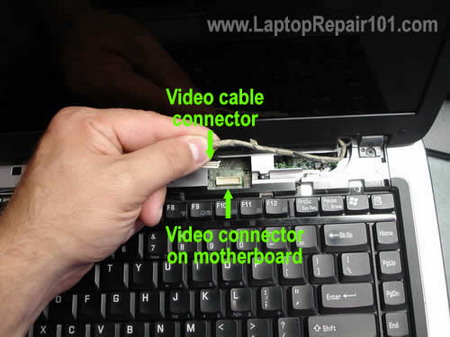
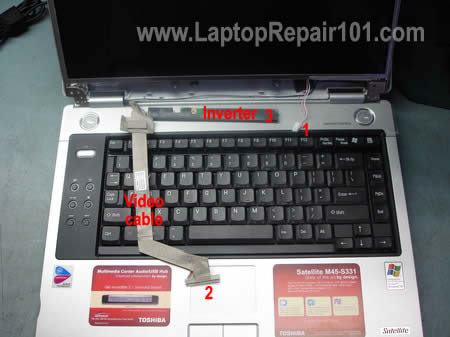
Also, try turning on the laptop with an external monitor when the video cable is unplugged from the motherboard. If the laptop start with video on the external monitor, apparently there is something wrong with the laptop display panel.
Remove laptop components
In my case removing the hard drive and DVD drive didn’t help. Unplugging the video cable didn’t help either.

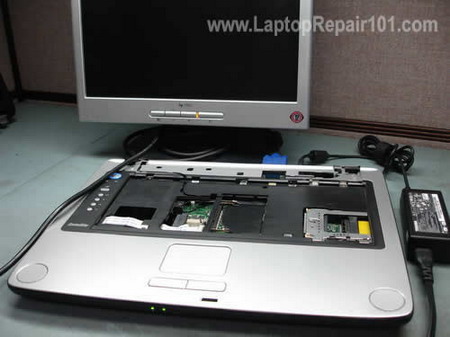
I continued taking my laptop apart piece by piece and tested it after each step.

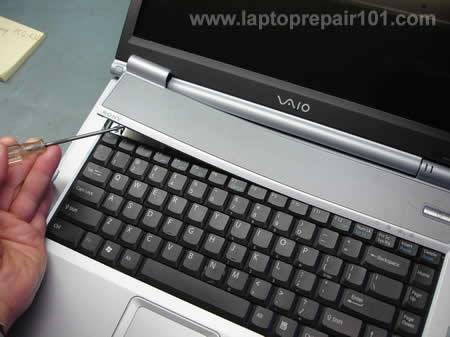
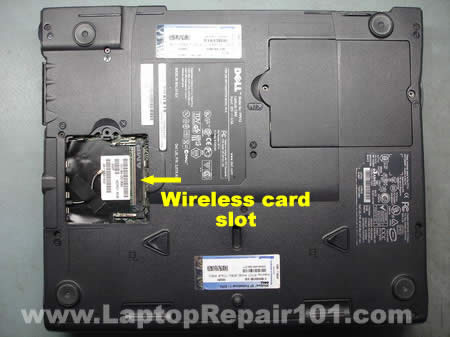
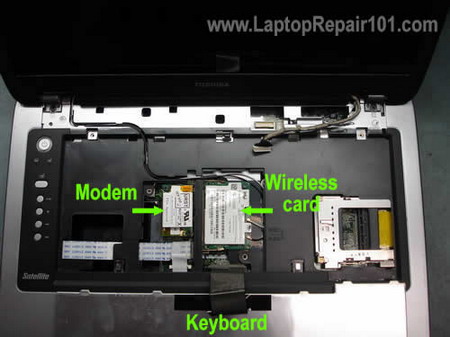
I removed wireless card, modem, disconnected the keyboard but it didn’t help.
Test laptop with external monitor
I still wasn’t able to boot the laptop with video on the external monitor.
Disassemble laptop
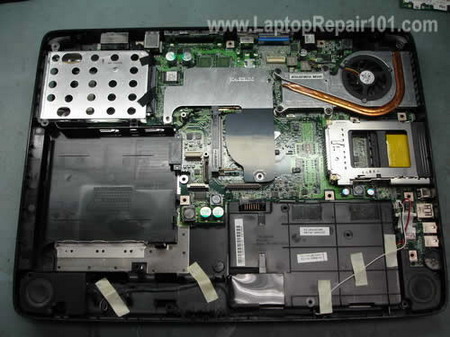
Finally, I disassembled the laptop and removed the motherboard.
Test laptop motherboard
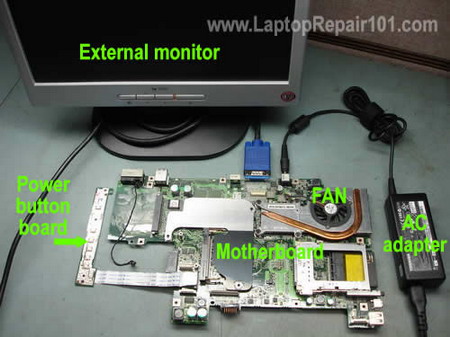
On this picture you see my final test. The motherboard has been removed from the base and I assembled basic barebone system on my bench.

1. Motherboard. Like on most laptops, in my case the video card is integrated into the motherboard

2. CPU with heatsink and cooling fan.

3. Known good memory module.

4. The power button board witch I need to turn on the system.

5. Working DC power adapter.
Still cannot get any video on the external monitor. The system turns on, the cooling fan starts spinning but there is no video.
At this point I’m 95% sure that the motherboard is dead. CPU failures are not very common, so it must be bad motherboard.